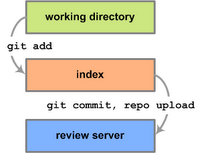
This page describes how to record changes to the Android files on your local client, upload those changes to the code-review server, and use Gerrit to track changes.
Prerequisites
Before you follow the instructions on this page, you will need to set up your local working environment and get the Android source files. For instructions, see Get source .Other recommended reading:
- For an overview of the code contribution and review process, see Life of a Patch.
- For details about Repo, see Using Repo and Git.
- For information about the different roles you can play within the Android Open Source community, see Project roles.
- If you plan to contribute code to the Android platform, be sure to read the AOSP's licensing information.
- Note that changes to some of the upstream projects used by Android should be made directly to that project, as described in Upstream Projects.
Working with the code
First, download the source into your working directory, as described in Get source . For information about how to choose which branch to use, see Android Code-Lines.To work on a particular change to the code, follow these steps:

- Use repo start branchname to start a new topic branch.
- Edit the files.
- Use git add to stage changes.
(Sometimes optional.)
- Use repo status and git diff to view the status of your files.
- Use git commit to commit changes.
- Use repo upload to upload changes to the review server
.
The steps will not always come in the order shown--for example, you might run git diff at several points in the process.
Starting a topic branch
Start a topic branch called default in your local work environment:$ repo start default
For more about topic branches, see Using Repo and Git.
Editing the files
You do not need to check files out before working on them. Edit the files using vim, emacs, or any other editor.Staging changes
To indicate that every new and modified file in your working directory should be "staged" for inclusion in the next commit, run git add without any arguments. You can also specify files or filetypes. For example, the following command would stage all the new and modified files under the bionic directory and its subdirectories:$ git add bionic/*
Run git help add to see more ways to use git add.
When is git add optional?
If you add new files, you must stage them using git add before you run git commit. However, if you are only modifying or deleting files, you can skip git add if you use the -a option with git commit. For more details, see the "Committing changes" section further down.
Using repo status
To see the status of the current branch, run $ repo status .
For information about how to interpret the results of repo status, see Using Repo and Git.
Using git diff
To see uncommitted changes, cd into the project directory and run$ git diff
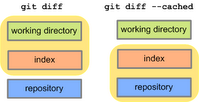
Without any arguments, git diff will show you the differences between the files in your working directory and the committed files.

If you add the --cached option, git diff will show you the differences between the files in your working directory and the staged files.
To see every edit that would go into the commit if you were to commit right now, make sure you are in the project directory and then run $ git diff --cached
Committing changes
At intervals while you are working, commit your edits by using git commit from within the project directory:$ cd ~/mydroid/project-name
$ git commit
Every file that you staged using git add will be included in this commit.
If you have not added any new files that you want to commit, you can skip git add and simply run
$ git commit -a
The -a option will stage all the files you have modified or deleted and include them in this commit. (If you have added new files and want them included in the commit, you will need to use git add before you run git commit.)
If commit does not find changes to be committed, it will report "nothing to commit (working directory clean)". If commit finds changes to be committed, a file will open in which you can create a log message:
Your comments about this commit go here....
# Please enter the commit message for your changes. Lines starting
# with '#' will be ignored, and an empty message aborts the commit.
# On branch master
# Changes to be committed:
#(use "git reset HEADfile..." to unstage)
#
#new file:.repo/projects/gerrit-manifests.git/FETCH_HEAD
#new file:.repo/projects/gerrit-manifests.git/HEAD
#new file:.repo/projects/gerrit-manifests.git/config
.
.
.
If you do not add a log message, the commit will be aborted. Add a message and save the file.
Committing changes during code review
If you previously uploaded a change to Gerrit and the Approver has asked for changes, follow these steps:- Edit the files to make the changes the Approver has requested.
- Recommit your edits using the --amend flag, for example:
$ git commit -a --amend - See below to upload the changes to Gerrit again for another review cycle.
Editing uploaded changes
To update an existing change with a new patch set:- Make sure the updated branch is the currently checked out branch.
- Use repo upload --replace proj1 to open the change matching editor.
- For each commit in the series, enter the Gerrit change Id inside the brackets.
Uploading changes to Gerrit
To upload your committed changes to the review server:- Complete the appropriate Contributor Agreement in Gerrit, granting the Android Open Source Project permission to distribute your changes to others.
- Select an SSH Username
and upload your public SSH key
, so that Gerrit can identify you when you upload changes.Please note that due to a bug in repo, repo upload requires your SSH Username be the local part of your email address (the text on the left of the @ sign).
These first two steps are only necessary prior to your first change.Gerrit will remember your agreement and SSH key for subsequent changes. - Update to the latest revisions:
$ repo sync
For information about how to handle sync conflicts and how Repo synchronization works, see Using Repo and Git . - Run repo upload to examine the list of all available changes and select which topic branches will be uploaded to the review server:
$ repo upload
This will open an editor window that will let you choose which topic branch to upload.If there is only one branch available, a simple y/n prompt is instead of an editor.
- Repo will give you a URL where you can view your submission.
- The code-review system will automatically notify the project owner about your submission.
Summary example
Here is a simple example that shows how you might work with the bionic/Android.mk file:$ cd ~/mydroid/bionic
$ repo start default
$ vi Android.mk
...edit and save the file...
$ git commit -a
$ repo sync
$ repo upload
...close the editable window that opens...
...visit the provided URL to open Gerrit and track your change...
Downloading changes from Gerrit
To download a specific change from Gerrit, run$ repo download target change
where target is the local directory into which the change should be downloaded andchange is the change number as listed in Gerrit . For more information, see Using Repo and Git .
Using the Gerrit code-review tool
You can open Gerrit by visiting whatever URL is returned to you from the repo upload command, or by visiting https://review.source.android.com.
Viewing the status of uploaded changes
To check the status of a change that you uploaded, open Gerrit
, sign in, and click MyChanges.
Reviewing a change
If you are assigned to be the Approver for a change, you need to determine the following:- Does this change fit within this project's stated purpose?
- Is this change valid within the project's existing architecture?
- Does this change introduce design flaws that will cause problems in the future?
- Does this change following the best practices that have been established for this project?
- Is this change a good way to perform the described function?
- Does this change introduce any security or instability risks?
Verifying a change
If you are assigned to be the Verifier for a change, you need to do the following:- Patch the change into your local client using one of the Download commands.
- Build and test the change.
- Within Gerrit use Publish Comments to mark the commit as "Verified", or "Fails" (and add a message explaining what problems were identified).
Viewing diffs and comments
To open the details of the change within Gerrit, click on the "Id number" or "Subject" of a change. To compare the established code with the updated code, click the file name under "Side-by-side diffs."Adding comments
Anyone in the community can use Gerrit to add inline comments to code submissions. A good comment will be relevant to the line or section of code to which it is attached in Gerrit. It might be a short and constructive suggestion about how a line of code could be improved, or it might be an explanation from the author about why the code makes sense the way it is.To add an inline comment, double-click the relevant line of the code and write your comment in the text box that opens. When you click Save, only you can see your comment.
To publish your comments so that others using Gerrit will be able to see them, click the Publish Comments button. Your comments will be emailed to all relevant parties for this change, including the change owner, the patch set uploader (if different from the owner), and all current reviewers.
After a submission is approved
After a submission makes it through the review and verification process, Gerrit automatically merges the change into the public repository. The change will now be visible in gitweb, and others users will be able to run repo sync to pull the update into their local client.How do I become a Verifier or Approver?
In short, contribute high-quality code to one or more of the Android projects. For details about the different roles in the Android Open Source community and who plays them, see Project roles .Using GitWeb to track patch histories
To view snapshots of the files that are in the public Android repositories and view file histories, use the Android instance of GitWeb .Upstream Projects
Android makes use of a number of other open-source projects, such as the Linux kernel and WebKit, as described in Branches & Releases. For the upstream projects detailed below, changes should be made directly upstream. Such changes will be incorporated into the Android tree as part of the usual process of pulling these projects.WebKit
All changes to the WebKit project atexternal/webkit should be made
upstream at http://www.webkit.org. The
process begins by filing a WebKit bug. This bug should use Android
for the Platform and OS fields only if the bug is
specific to Android. Bugs are far more likely to receive the reviewers'
attention once a proposed fix is added and tests are included. See
Contributing Code to
WebKit for details.
V8
All changes to the V8 project atexternal/v8 should be submitted
upstream at
http://code.google.com/p/v8. See
Contributing to V8
for details.
